Plugins System
The plugins system is very powerful, so please refrain from installing plugins from unknown sources, or encrypted plugins, or the plugins that are sophisticated and hard to audit, as they may harm your system
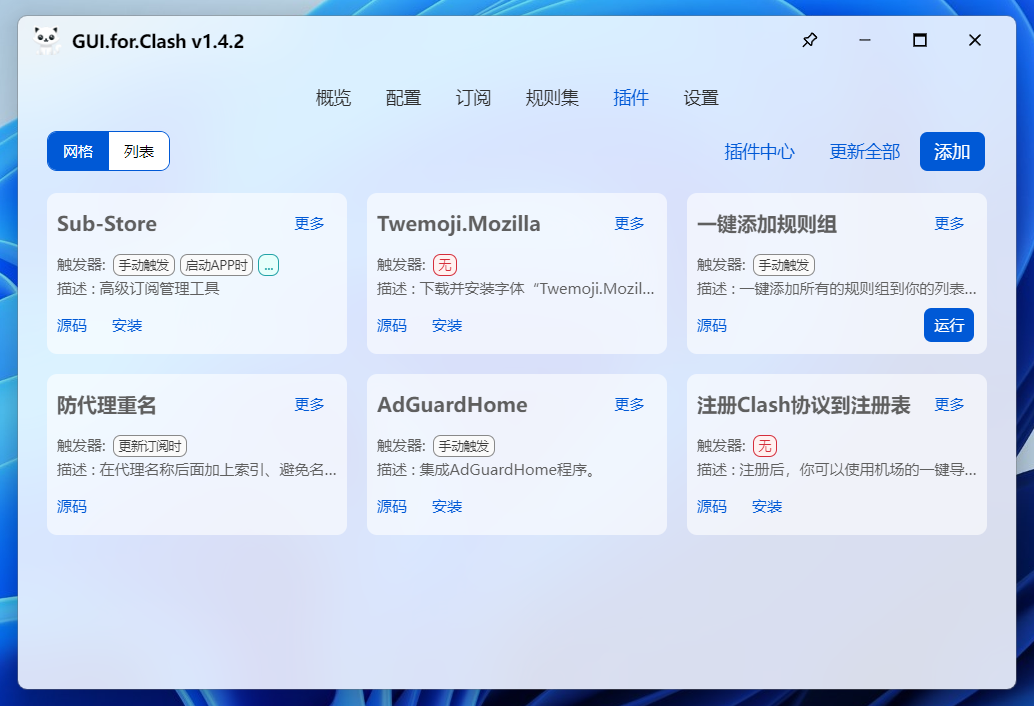
What Can the Plugins Do?
Modifies the application's themes and languages, manages profiles, subscriptions, rulesets, and cores.
Modifies the generated configurations and the subscription data
Integrates third-party applications, expand GUI capabilities
All GUI operations can be performed by plugins
How Plugins Work
Plugins in GUI are a series of triggers. These triggers are executed when certain conditions are met. GUI supports the following types of triggers:
on::manual: Executes when the Run button is clicked, GUI performs the actiononRUNin the source codeon::subscribe: Executes when the subscriptions are being updated, GUI performs the actiononSubscribein the source code and passes a parameter, which is an array of the proxy lists. This action requires returning an array of the proxy listson::generate: Executes when the configuration file is generated. GUI performs the actiononGeneratein the source code and passes a parameter, which is an object containing the configuraion for the cores. This action needs to return the processed parameters or return them unchanged.on::startup: Executes when the application is started, GUI performs the actiononStartupin the source code, no parameter is passed, and no data needs to be returnedon::shutdown: Executes when the application is closed, GUI performs the actiononShutdownin the source code, no parameter is passed, and no data needs to be returned
When the onInstall parameter of a plugin is present, Install and Uninstall button will be added to the plugin card. Upon clicking, GUI will perform the onInstall and onUninstall actions in the source code. These actions can be used for initialization and follow-up tasks. When the onInstall action executes without errors, GUI will consider the plugin successfully installed and mark it as installed. When the onUninstall action executes without errors, GUI will consider the plugin successfully uninstalled and mark it as uninstalled (i.e., not installed)
When menus is present in the plugin settings, the corresponding options will appear on the menu when right-clicking the plugin card. Upon clicking the options, the corresponding actions will be performed
When configuration is present in the plugin settings, right-click on the plugin card to configure the plugin
Plugin Status Code
Plugin hooks are able to return status codes. For example, when onRun returns code 1, it means the plugin is initialized and running. Moreover, if the Stop action in the customizable menu returns code 2, it means the plugin is stopped and exited.
The status codes are:
- 0 No Status, recommended for use in
onInstallandonUninstallactions - 1 Running, recommended for use in
onRunactions - 2 Stopped, recommended for use in the customizable menu
Stopactions
The following content is an example, which includes all hooks' actions
/**
 * 插件钩子:运行按钮 - onRun
 */
const onRun = async () => {
  await StartMyProgram();
  return 1; // 表示插件正在运行中
};

/**
 * 自定义菜单项:停止 - Stop
 */
const Stop = async () => {
  await StopMyProgram();
  return 2; // 表示已经停止运行
};

/**
 * 自定义菜单项:运行 - Start
 */
const Start = async () => {
  await StartMyProgram();
  return 1; // 表示插件正在运行中
};

/**
 * 插件钩子:安装按钮 - onInstall
 */
const onInstall = async () => {
  await InstallMyProgram();
  return 0; // 表示初始状态
};

/**
 * 插件钩子:卸载按钮 - onUninstall
 */
const onUninstall = async () => {
  await UninstallMyProgram();
  return 0; // 表示初始状态
};

/**
 * 插件钩子:更新订阅时
 */
const onSubscribe = async (proxies, subscription) => {
  return proxies;
};

/**
 * 插件钩子:生成配置时
 */
const onGenerate = async (config, profile) => {
  return config;
};

/**
 * 插件钩子:启动APP时
 */
const onStartup = async () => {};

/**
 * 插件钩子:关闭APP时
 */
const onShutdown = async () => {};

/**
 * 插件钩子:APP就绪后
 */
const onReady = async () => {};

/**
 * 插件钩子:计划任务执行时
 */
const onTask = async () => {};

/**
 * 插件钩子:配置插件时
 */
const onConfigure = async (config, old) => {};
Code of Conduct for Creating Plugins
The code should be well-formatted, easy to read, and non-encrypted
I/O operations should be performed inside the application's data folder, refrain from accessing the user's private folders
Temporary files should be stored in the
data/.cachefolder, the files must be deleted upon the completion of the operationsThird-Party applications should be placed in the
data/thirdfolder, the corresponding folder must be deleted upon uninstallationRefrain from dynamically creating
script,style, and other tags, as well as importing external js, CSS, and similar operationsIf any invasive operations are performed on the operating system, the changes must be reverted upon uninstallation
Examples of Creating Plugins
- Example of An
onRunTriggered Plugin
First, create a plugin:
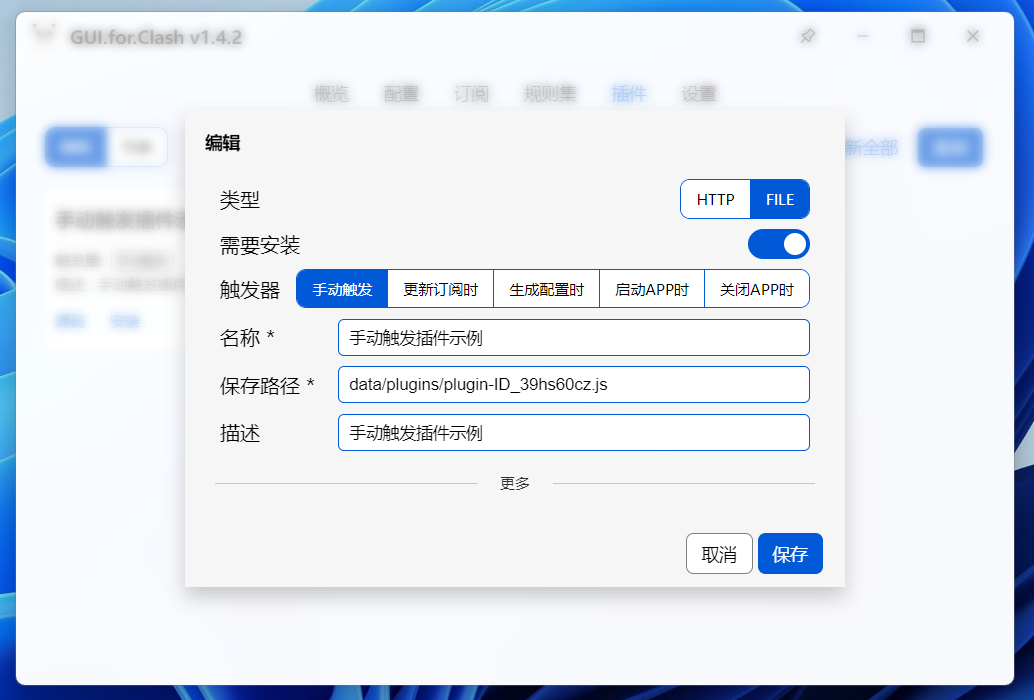
then, write the corresponding code:
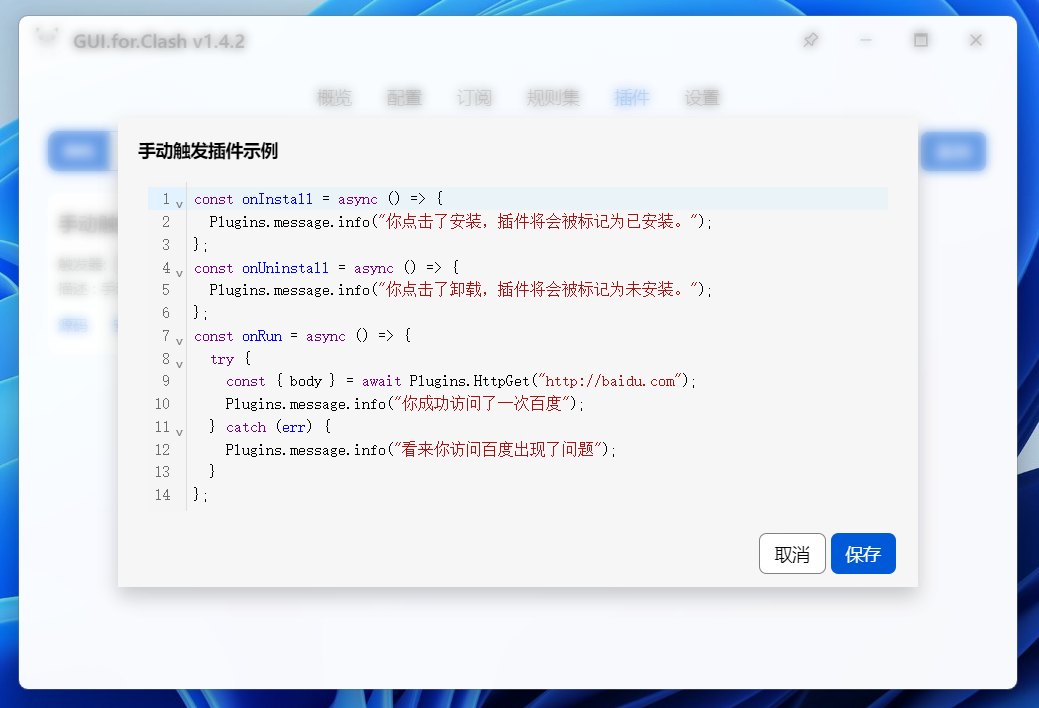
Finally, try to install, run and uninstall the plugin
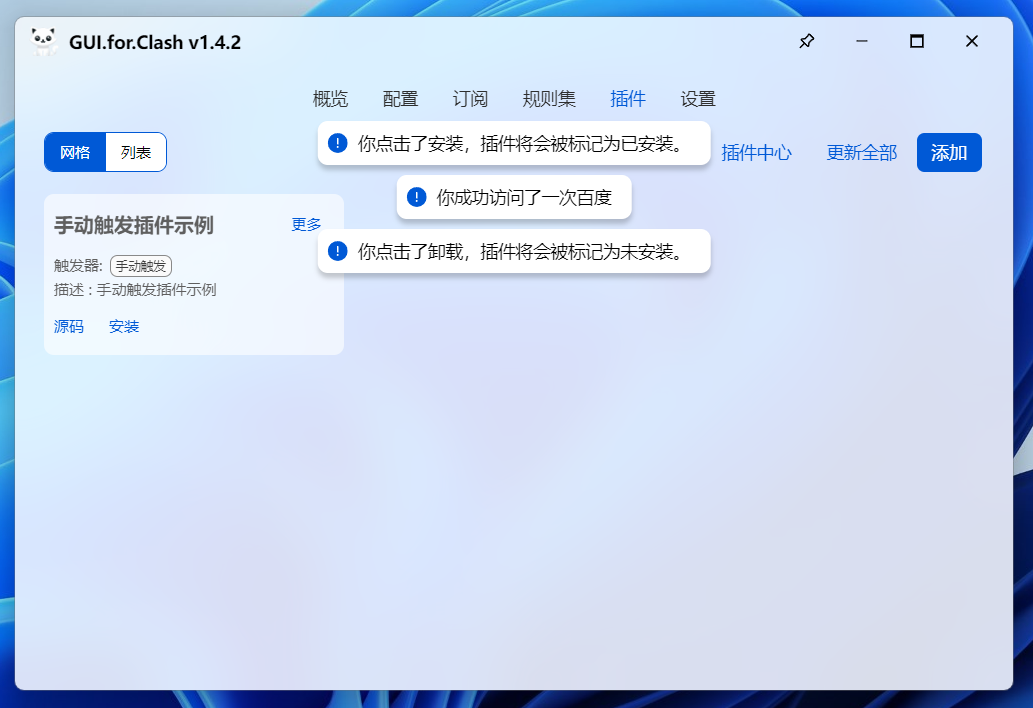
The following plugin examples require the same steps: create, write the code, and run.
- Example of An
onSubscribeTriggered Plugin
// params: proxies是一个代理数组
// params: metadata是订阅元数据
// return: 请返回一个代理数组[]
const onSubscribe = (proxies, metadata) => {
  // 示例:把节点名称中的新加坡替换为空
  proxies = proxies.map((v) => {
    return {
      ...v,
      name: v.name.replace("新加坡", ""),
    };
  });
  return proxies;
};- Example of An
onGenerateTriggered Plugin
// params: config是已生成的标准的内核配置,即config.yaml文件的内容
// params: metadata是生成内核配置的源数据,即GUI所使用的profile数据
// return: 请返回标准的内核配置
const onGenerate = (config, metadata) => {
  if (metadata.name == "某个profile") {
    // 仅当某个profile时,才处理
    // 一些处理...
  }
  // 移除tun配置
  delete config.tun;
  // 关闭DNS服务器
  config.dns.enable = false;
  return config;
};- Example of An
onStartupTriggered Plugin
const onStartup = () => {
    alert('APP启动了')
}- Example of An
onShutdownTriggered Plugin
const onShutdown = () => {
    alert('APP关闭了')
}
Capabilities: Plugins
We demonstrated Plugins.message and Plugins.HttpGet above. So what other capabilities does the Plugins object have? Press Ctrl+Shift+F12 in the application interface to open the DevTools, switch to the console tab, type Plugins, and press Enter to find out. For more detailed examples, refer to the source code.
More Examples
// 消息提示示例
const { id } = Plugins.message.info('GUI.for.Cores', 4_000)
await Plugins.sleep(1_000)
Plugins.message.update(id, 'is')
await Plugins.sleep(1_000)
Plugins.message.update(id, 'powerful')
await Plugins.sleep(1_000)
Plugins.message.destroy(id)

// APP设置示例
const appSettings = Plugins.useAppSettingsStore()
appSettings.app.theme = 'dark' // light
appSettings.app.lang = 'en' // zh

// 系统代理管理示例
const envStore = Plugins.useEnvStore()
envStore.setSystemProxy()
envStore.clearSystemProxy()
envStore.switchSystemProxy()

// 内核管理示例
const kernelApiStore = Plugins.useKernelApiStore()
kernelApiStore.startKernel()
kernelApiStore.stopKernel()
kernelApiStore.restartKernel()

// 配置管理示例
const profilesStore = Plugins.useProfilesStore()
profilesStore.addProfile(p: ProfileType)
profilesStore.editProfile(id: string, p: ProfileType)
profilesStore.deleteProfile(id: string)

// 订阅管理示例
const subscribesStore = Plugins.useSubscribesStore()
subscribesStore.addSubscribe(s: SubscribeType)
subscribesStore.editSubscribe(id: string, s: SubscribeType)
subscribesStore.deleteSubscribe(id: string)
subscribesStore.updateSubscribe(id: string)

// 规则组管理示例
const rulesetsStore = Plugins.useRulesetsStore()
rulesetsStore.addRuleset(r: RuleSetType)
rulesetsStore.editRuleset(id: string, r: RuleSetType)
rulesetsStore.deleteRuleset(id: string)
rulesetsStore.updateRuleset(id: string)

// 插件管理示例
const pluginsStore = Plugins.usePluginsStore()
pluginsStore.addPlugin(p: PluginType)
pluginsStore.editPlugin(id: string, p: PluginType)
pluginsStore.deletePlugin(id: string)
pluginsStore.updatePlugin(id: string)
pluginsStore.reloadPlugin(plugin: PluginType, code = '')
pluginsStore.updatePluginTrigger(plugin: PluginType)

// 计划任务管理示例
const scheduledTasksStore = Plugins.useScheduledTasksStore()
scheduledTasksStore.deleteScheduledTask(id: string)
scheduledTasksStore.editScheduledTask(id: string, s: ScheduledTaskType)
scheduledTasksStore.addScheduledTask(s: ScheduledTaskType)
Plugin-Hub and Notes
Plugin-Hub is a repository for users to conveniently download plugins, the source code can be reviewed on Plugin-Hub。
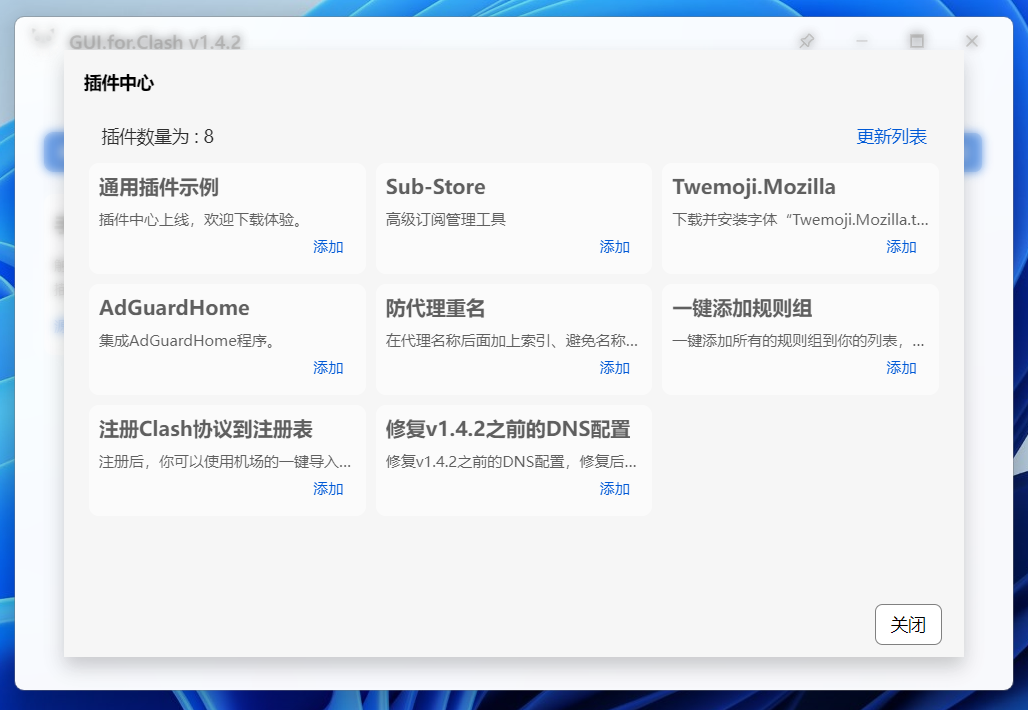
Modifying the source code of the plugins downloaded from Plugin-Hub is discouraged by clicking the EditDevelope) button on the plugin card's top right menu. This is because all the plugins published in Plugin-Hub are already debugged, and the triggers, menus and config options are all well-designed. If users arbitrarily edit these plugins, such as adding triggers that are not implemented in the source code, the plugins will fail to execute
So why do we not remove the Develope button? Because we want to leave the choices to the users. Some users might have ideas to improve the capabilities of the existing plugins, GUI does not limit these users
But what if the source code is messed up? Uninstall and delete the plugins, then go to the Plugin-Hub and reinstall them
Why do some plugins have the Install and Uninstall buttons while others do not? This depends on how the plugins work. For example, the plugin AdGuardHome itself does not provide any functionalities; it requires a third-party application to work, that is why the Install and Uninstall buttons are provided for downloading and uninstalling the application. Moreover, 节点转换 plugin does not require any third-party applications to run, so the Install and Uninstall buttons are not necessary
Some plugins need to be configured before functioning, right-click on the plugin card and choose the third option Configure to open the config page. Some plugins do not have the Configure option, which means that these plugins do not require to be configured to function
That's about it. We welcome you to write plugins for GUI and submit them to the Plugin-Hub